
Table of Contents
ToggleYour water softener works hard to keep limescale and mineral buildup off your fixtures and out of your appliances, but only if it drains properly. An air gap is the unsung hero of that drainage system, and it’s a detail most homeowners overlook until something goes wrong. Whether you’re installing a new softener or troubleshooting an existing one, understanding why an air gap matters (and how to maintain it) can save you from costly backups, contaminated water, and frustrated plumbing calls. Let’s walk through what an air gap is, why it’s critical, and how to keep yours functioning year-round.
Key Takeaways
- A water softener air gap is a physical 1–2 inch break in your drain line that prevents backflow and contamination by stopping wastewater from siphoning back into your potable water supply.
- Most building codes, including the International Residential Code (IRC), require a water softener air gap for code compliance, and inspectors will flag missing air gaps during permit inspections.
- Signs of a failing air gap include water pooling around the softener, poor drainage during regeneration cycles, kinked or cracked hoses, salt buildup, reduced softening effectiveness, and rotten-egg odors.
- Installing a water softener air gap is a straightforward DIY project: connect the vinyl drain hose to the outlet barb with a hose clamp and position the hose end 1–2 inches above the drain opening.
- Common air gap problems—such as kinked hoses, clogs, loose clamps, and leaks—can be fixed by straightening tubing, rinsing the drain line, tightening connections, and insulating exposed hoses in cold climates.
- A properly functioning air gap prevents costly backups, protects water quality, and ensures your softener’s regeneration cycle works efficiently to remove minerals and limescale from fixtures and appliances.
What Is a Water Softener Air Gap?
An air gap is a physical break in your water softener’s drain line, a small space between where the drain hose terminates and where wastewater enters your home’s drainage system. Think of it as a safety valve that prevents backflow and contamination.
When your softener regenerates (the process where it cleans out trapped minerals), pressurized water and brine solution exit through the drain line. Without an air gap, that wastewater could theoretically siphon back into your potable water supply if drain pressure drops. An air gap stops that dead. It’s a simple but critical safeguard, and building codes in most jurisdictions require one.
The Drain Line Explanation
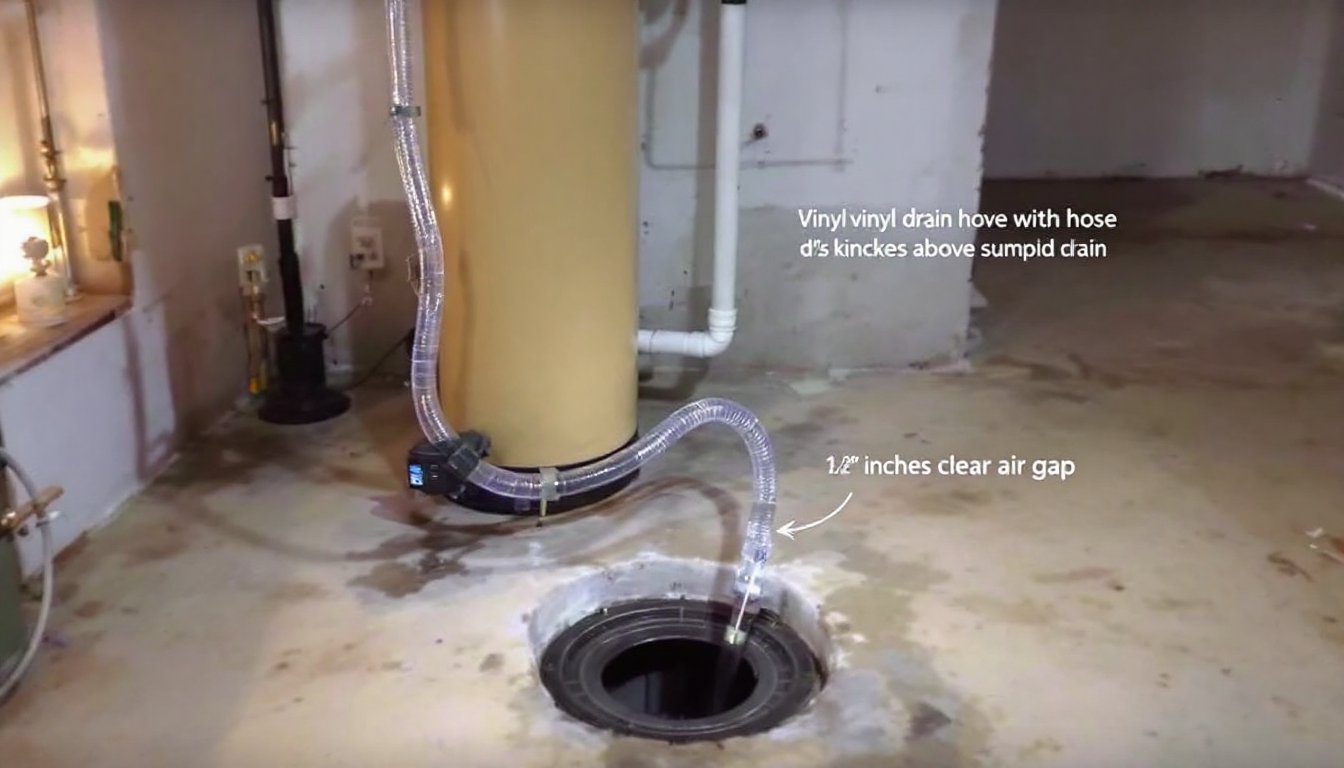
Your water softener’s drain line carries the brine and mineral-rich water that exits during the regeneration cycle. This line connects to a standpipe, floor drain, or sump basin. The air gap sits right where the hose ends, typically 1 to 2 inches above the drain opening. That small space allows water to fall freely into the drain rather than creating a continuous sealed connection.
Why does this matter? A sealed drain line can trap air or create a siphon effect, pulling dirty water backward into the softener’s water supply line. That’s a public health risk and a code violation. The air gap breaks the siphon by introducing atmosphere between the softener and the drain. It’s low-tech, foolproof, and absolutely essential.
Why Your Water Softener Needs an Air Gap
Water softeners regenerate on a schedule (typically every 2–7 days, depending on your household’s water hardness and usage). During regeneration, the system pushes brine and mineral-laden water out through the drain line. If that drain backs up or becomes restricted, water can’t leave the softener. Without an air gap, backpressure can force wastewater up and back into the fresh water supply.
Most municipal codes, including those following the International Residential Code (IRC), mandate an air gap for softeners. Inspectors will flag a missing air gap on a permit inspection, and insurance might not cover water damage from improper drainage. Beyond code compliance, think of it as protecting your family’s drinking water quality. Water softener regulations vary.
A proper air gap also prevents clogs in your drain line. If the hose sits directly in a drain and debris accumulates, the entire softener can become inoperable until you clear it. The air gap lets gravity do the work, making clogs far less likely.
Signs Your Air Gap Is Failing
A failing air gap often announces itself with telltale signs. Watch for water pooling around the base of your softener during regeneration cycles, or notice if the softener is running but not draining properly. You might also see salt buildup or mineral residue around the drain line connection, a sign that water is leaking or backing up.
If your softener isn’t softening water as well as it used to, a clogged or failed air gap drain could be the culprit. A blocked drain forces the regeneration cycle to abort prematurely, leaving the resin bed partially saturated with minerals. Over time, this reduces the softener’s effectiveness.
Another red flag is a kinked, cracked, or disconnected drain hose. Physical damage compromises the air gap’s integrity. If the hose has been stepped on, crushed by a heavy object, or damaged by rodents, it won’t drain. Even a small crack can allow water to seep out in your mechanical room instead of flowing to the drain.
Smell is also telling. A sulfurous or rotten-egg odor near the softener or drain line suggests stagnant water is sitting in the hose or the drain line itself. That’s a sign the system isn’t draining and water is backing up.
How to Install a Water Softener Air Gap
If you’re installing a new softener or replacing a faulty air gap, the job is straightforward and requires only basic tools and materials. You’ll need a standpipe or dedicated drain line (most softeners come with a clear vinyl hose), a hose clamp or barbed fitting, and a bucket or floor drain nearby. Some installations use a sink tailpiece or punch-hole fitting that inserts into an existing drain line, but a standpipe is the most reliable and code-compliant option.
Measure the distance from the softener’s drain outlet to your drain location. Most hoses come in standard lengths, but you can cut vinyl hose with a sharp utility knife if needed (cut cleanly to avoid fraying). Slide a hose clamp onto the drain hose, push the hose onto the softener’s outlet barb firmly, and tighten the clamp. Family Handyman’s step-by-step guides cover plumbing connections in detail if you need extra reference.
Step-by-Step Installation Guide
-
Turn off the water supply and depressurize the softener by running a manual regeneration cycle. Wait for the brine tank to empty before proceeding.
-
Locate the drain outlet on the softener (it’s usually a small plastic barb on the side or back of the unit). Use a wet cloth to clean any mineral deposits or debris.
-
Slide a hose clamp over one end of the vinyl drain hose (typically 1/2 inch or 5/8 inch diameter, check your softener’s specs).
-
Push the hose firmly onto the softener’s outlet barb until it seats fully. Tighten the hose clamp snugly with a screwdriver: don’t over-tighten or you’ll crack the barb.
-
Route the hose to the drain location, avoiding sharp kinks or tight bends. If you need to run it along a wall or under a floor, secure it loosely with adhesive clips, leave room for thermal expansion.
-
Position the hose end 1 to 2 inches above the drain opening (standpipe, sink, or floor drain). This is your air gap. The hose should not sit directly in the drain.
-
Test the connection by running a manual regeneration cycle. Watch the drain hose during the first 10 minutes to confirm water flows freely without pooling or leaking at the connection.
-
Check for leaks after the first few regeneration cycles. If water drips from the hose clamp, tighten it slightly. If the hose slips, re-seat it and re-tighten the clamp.
Common Air Gap Problems and Solutions
Kinked or Crushed Hose
A hose bent too sharply during installation or crushed by something resting against it will restrict water flow. Remove anything pressing on the hose and straighten it gently. If the kink is permanent or the hose is cracked, replace the section of hose or the entire drain line.
Clogged Standpipe or Drain Line
Mineral deposits, sediment, or debris inside the hose can slow or block drainage. Disconnect the hose at both ends and rinse it thoroughly with clean water, using a flexible brush if needed to scrub the interior. If the standpipe itself is clogged, you may need to clear it from above or below (depending on your plumbing configuration).
Loose or Missing Hose Clamp
Vibration or thermal cycling can loosen a clamp over time, causing the hose to slip off the barb. Check clamps twice a year and re-tighten if needed. Replace any rusty or corroded clamps immediately.
Hose Too Long or Positioned Incorrectly
If the hose end is sitting directly in the drain (eliminating the air gap) or coiled in standing water, backflow or siphoning becomes possible. Adjust the hose position so it’s 1–2 inches above the drain. If excess hose is creating a problem, carefully cut it to length and re-clamp it.
Leaks at the Softener Connection
A weeping leak at the drain outlet barb usually means the hose isn’t fully seated or the clamp is too loose. Loosen the clamp, pull the hose off gently, inspect the barb for cracks or mineral buildup, clean it if needed, and re-seat the hose firmly. Tighten the clamp in a cross pattern (quarter-turn at a time) to avoid over-tightening one side.
Frozen Drain Hose (Cold Climates)
In freezing temperatures, water in an exposed drain hose can freeze, blocking the line. If your softener is in an unheated garage or basement, insulate the hose with foam pipe wrap or reroute it through a heated space if possible. Run a test regeneration cycle before winter to confirm drainage works smoothly.
HomeAdvisor’s project cost guides can help you estimate the cost of professional help if you’re uncomfortable tackling repairs yourself. Most air gap fixes are DIY-friendly, but if your softener is still under warranty, check the documentation before disassembling anything.