
Table of Contents
ToggleA wallpaper accent wall can completely reinvent a bedroom without the expense and commitment of redecorating the entire room. Whether you’re drawn to botanical prints, geometric patterns, or moody jewel tones, a single accent wall offers an approachable way to inject personality and depth into your space. Many homeowners hesitate because wallpaper feels permanent or intimidating, but modern removable options and straightforward installation techniques make this a realistic weekend project. Unlike painting all four walls, an accent wall lets you test a bold design choice while keeping three walls neutral as a visual buffer.
Key Takeaways
- A wallpaper accent wall in the bedroom delivers dramatic visual impact without the cost and commitment of redecorating the entire room, with modern removable options making installation a realistic weekend project.
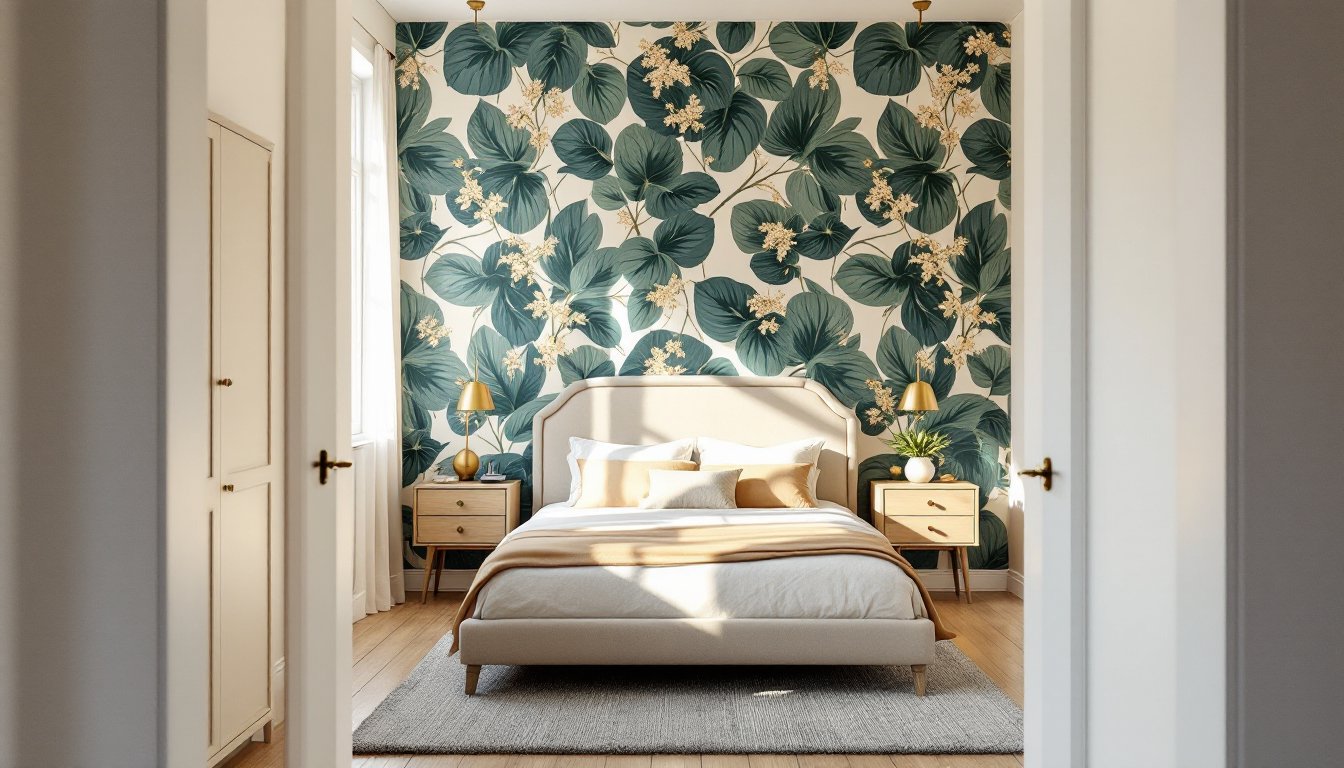
- The wall behind your bed is the ideal location for a wallpaper accent wall because it serves as the primary focal point you see when entering or resting in the room.
- Proper wall preparation—including filling dents, sanding glossy surfaces, and priming—is critical to preventing bubbling and poor adhesion, with most installation failures occurring during prep work.
- Choose wallpaper patterns and colors based on your room’s size and existing elements; smaller bedrooms work better with subtle textures or small-scale florals, while larger spaces can handle bold, large-scale geometric designs.
- A standard double roll of wallpaper covers approximately 56 square feet, so measure your accent wall carefully and add an extra roll to your calculation for pattern matching, waste, and installation mistakes.
- Peel-and-stick wallpaper offers quick installation with no drying time, while traditional paste wallpaper provides richer texture and durability, so choose based on your skill level and whether you rent or own.
Why Wallpaper Accent Walls Work In Bedrooms
A bedroom is the ideal room for a wallpaper accent wall because it’s a personal retreat where bold choices feel intentional rather than chaotic. Unlike a living room that serves multiple functions, your bedroom exists primarily for rest and aesthetic enjoyment, so there’s less visual competition from traffic patterns or mixed activities.
An accent wall creates a focal point that draws the eye immediately. When you enter, your gaze lands on that statement wall behind the bed or alongside a window, anchoring the room’s design narrative. This visual hierarchy makes smaller bedrooms feel more intentional and larger ones feel cozier. You’re also working with a contained space, which means material costs stay reasonable and the project finishes faster than wallpapering an open-plan area.
The practical advantage is flexibility. A well-executed accent wall can stay for years or evolve as your tastes shift. Peel-and-stick wallpapers have improved dramatically, offering realistic textures and patterns without permanent adhesive, ideal if you rent or change your mind. Traditional wallpaper paired with paste gives you richer texture and durability but requires more careful removal. Either way, you’re not locked into the choice the way you would be with structural changes.
Choosing The Right Wallpaper Pattern And Color
Your wallpaper choice sets the tone for the entire bedroom, so it’s worth spending time narrowing down what actually appeals to you rather than what you think you should like. Start by gathering inspiration from rooms you genuinely love, save photos, take screenshots, and notice what patterns and colors keep appearing in your selections. That repetition reveals your true preferences.
Consider the room’s existing elements: bedding, flooring, window treatments, and lighting all influence how a pattern reads on the wall. A sample swatch under different times of day (morning light, evening light, lamp light) shows you the true color and prevents the disappointment of a hue that looked perfect at the store but feels off at home. Many retailers offer sample rolls for $10–$15, a worthwhile investment.
Think about scale relative to your room size. A large-scale geometric pattern in a small bedroom can feel overwhelming: smaller-scale florals or subtle textures work better in compact spaces. In larger bedrooms, bolder patterns have room to breathe. Pattern intensity matters too, a busy, intricate design can feel restless in a space meant for relaxation, while something too minimal might not justify the accent wall effort.
Popular Patterns And Styles
Modern bedroom wallpapers span several trending directions. Botanical and naturalistic designs, oversized leaves, delicate florals, nature-inspired abstracts, pair well with warm metals and natural wood furniture. Geometric patterns (chevron, hexagon, damask, geometric grids) lean contemporary and work with minimalist or mid-century aesthetics. Textured or grasscloth finishes add tactile interest without loud imagery, creating a sophisticated, understated look. Jewel-tone solids or ombré effects deliver drama with minimal pattern, ideal if you love color but want restraint. House Beautiful’s collection of 27 bold bedroom wallpaper ideas shows real examples across all these categories, giving you a sense of how each style performs in actual bedrooms.
Color temperature affects mood. Cool tones (blues, grays, purples, teals) promote calm and work beautifully in master bedrooms. Warm tones (terracotta, ochre, blush, cream) feel cozier and pair well with vintage or eclectic furnishings. Neutrals with subtle pattern (cream damask, soft geometric in grays) are timeless choices that won’t feel dated in three years.
Planning Your Accent Wall Layout
Before you order wallpaper, you need to measure your accent wall and understand its dimensions and any architectural quirks. Measure the wall’s height and width in two places (top and bottom, left and right) to catch any out-of-square walls that are more common than you’d expect. Standard wallpaper comes in rolls: different manufacturers offer different widths (typically 20.5″ to 27″), so you need to know your wall dimensions to calculate how many rolls you’ll need.
Most retailers and manufacturers provide coverage charts that tell you how many rolls cover a given square footage. A rule of thumb: a standard double roll covers about 56 square feet. If your wall is 10 feet wide by 9 feet tall (90 square feet), you’d need roughly two rolls, plus an extra roll for waste, pattern matching, and mistakes. Wallpaper often comes in double or triple rolls, so confirm the packaging before calculating.
Check for obstacles: outlet boxes, light switches, window trim, baseboard height, and ceiling trim all complicate the installation. You’ll need to cut around these rather than working around them, so account for the extra steps in your timeline and skill assessment. Uneven surfaces (textured drywall, minor dents, wavy plaster) show through wallpaper, so if your wall isn’t smooth, you may need to patch and sand first, a job that extends your prep timeline significantly.
Which Wall Should You Choose
The wall behind your bed is the most common and visually logical choice. It’s the focal point you see when lying down or entering the room, and wallpaper there feels intentional rather than incidental. A wall with a window or multiple windows works too, though window trim makes installation trickier and the pattern may be partially hidden by curtains or shades during much of the day.
Avoid walls facing the bedroom entry: that location can feel jarring as you step into the room, especially with very bold patterns. Skip walls with a main closet, entryway, or heavy furniture placement unless you’re certain it enhances the layout. A recessed or angled wall (like in attic bedrooms) is trickier to paper and shouldn’t be your first choice unless you’re experienced.
Step-By-Step Installation Guide
Materials Needed:
• Wallpaper and paste (or peel-and-stick wallpaper)
• Primer and drywall primer (if your wall absorbs moisture unevenly)
• Tape measure, level, pencil
• Straight edge or chalk line
• Wallpaper smoothing tool, sponge, and seam roller
• Utility knife and fresh blades
• Sanding sponge and joint compound (for wall prep)
• Drop cloth or plastic sheeting
Tools:
• Paint roller or brush (for paste application, if not peel-and-stick)
• Putty knife or scraper
• Ladder
Prep Work (Critical, most failures happen here):
-
Clear and protect the room. Remove picture frames, artwork, and anything hanging on that wall. Lay down drop cloths or plastic sheeting on the floor and protect baseboards with painter’s tape.
-
Inspect and repair the wall. Feel for bumps, holes, or loose paint. Fill dents with joint compound, sand smooth once dry, and spot-prime those areas. If the wall is heavily textured, you’ll either need to texture your wallpaper strips to match or smooth the wall first, a bigger undertaking. Glossy or semi-gloss paint doesn’t grip wallpaper well, so sand it lightly with 120-grit sandpaper to dull the finish.
-
Prime the wall. Even if the wall is already painted, a primer designed for wallpaper installation helps adhesion and allows easier removal later. Let it dry completely (usually 2–4 hours: check the can).
Installation (Traditional Paste Wallpaper):
-
Establish a plumb line. Measure from the ceiling and mark a vertical line on the wall using a level or chalk line. This is your starting point for the first strip and keeps everything straight. Wallpaper expands slightly when wet, so place this line about half a strip width from the corner, not in the corner itself.
-
Cut strips. Unroll wallpaper on a clean, flat surface and measure the wall height, adding 2–3 inches for overlap at top and bottom. Cut strips straight using a sharp utility knife against a straightedge. If your wallpaper has a pattern, match patterns on consecutive strips before cutting.
-
Apply paste. Follow the manufacturer’s instructions, some pastes go on the wall, others on the wallpaper itself. Use a paint roller or brush to apply an even, thin layer. Don’t oversaturate: excess paste squeezes out and makes seams messy.
-
Hang the first strip. Align the top edge with the ceiling (not the top of the wall, which may be uneven) and smooth it down using your straightedge or smoothing tool, working out bubbles and wrinkles as you go. Once positioned, trim the excess at the bottom using a sharp blade and straightedge held firmly against the baseboard.
-
Hang subsequent strips. Butt each new strip against the previous one, they should touch without overlapping unless the pattern requires matching, in which case allow a slight overlap, cut through both layers, and remove the waste. A seam roller pressed gently along the joint helps glue seep out and binds the seams firmly.
-
Wipe excess paste. Use a damp sponge to immediately wipe away paste oozing from seams or dripping down the wall. Let it dry fully (usually 24 hours) before moving furniture back.
For Peel-and-Stick Wallpaper:
The process is simpler but requires a perfectly smooth wall because any bumps or dust show. Establish your plumb line the same way. Measure and cut strips to height. Peel back the backing 6–12 inches, align the top edge, and smooth it down using your tool. Gradually peel away the backing while smoothing, working downward to avoid bubbles. The advantage: no paste drying time, no water damage risk, and easier removal. The drawback: less forgiving if you misalign, and the adhesive won’t grip textured walls reliably.
Common Mistakes to Avoid:
• Skipping wall prep. A rough, dirty, or glossy wall causes bubbling and poor adhesion.
• Ignoring pattern repeats. Cutting randomly wastes wallpaper and creates obvious mismatches.
• Using too much paste or water. This causes swelling, warping, and slow drying.
• Rushing the drying phase. Opening windows or blowing air on a damp wall causes peeling.
• Cutting corner seams too carelessly. The first and last seams in the corner are visible, so take your time there.
If you’re uncertain about any step, test a small section first or call in a professional. Many decorators charge $200–$500 to hang a single accent wall, which buys peace of mind and a cleaner result if this is your first attempt. DIY home renovation sites like Young House Love and Addicted 2 Decorating offer photo tutorials and honest accounts of both successful projects and learning moments.
Conclusion
A wallpaper accent wall transforms a bedroom with minimal cost and commitment compared to major renovations. Success hinges on three things: honest pattern and color selection that reflects your taste, meticulous wall prep that creates a smooth surface, and careful installation or hiring help if you’re unsure. The result is a room that feels intentional, personal, and refreshed, proof that sometimes the biggest visual impact comes from focusing boldly on a single, well-chosen element.